Thursday, July 12, 2012

CaraCakes Take on a French Hamburger


I was flipping through my Julia Child cookbook, and found myself reading about how the French make hamburgers.  They seemed pretty different than our burgers on this side of the pond, but no less delicious.  Since I didn't have any ground beef, I opted to try a Biftek Haché à la Lyonnaise (Ground Beef with Onions and Herbs) with ground white turkey rather than beef.  And wow, was it delicious.

Here is the recipe straight from Julia Child's "Mastering the Art of French Cooking":

Biftek Haché à la Lyonnaise (Ground Beef with Onions and Herbs)

You'll need:

¾ cup finely minced yellow onions
2 tablespoons butter
1 ½ pounds lean ground beef
2 tablespoons butter, softened
1 ½ teaspoons salt
1/8 teaspoon pepper
1/8 teaspoon thyme
1 egg
½ cup flour, spread on a plate
1 tablespoon butter and 1 tablespoon oil
½ cup beef stock, canned beef bouillon, dry white wine, dry white vermouth or red wine (I used white wine)
2-3 tablespoons butter, softened

Instructions:
  • Cook the onions slowly in the butter for about 10 minutes until very tender but not browned. Place in a mixing bowl. Add the beef, butter, seasonings and egg to the onions in the mixing bowl and mix thoroughly to combine ingredients. Form into patties ¾-inch thick. Cover with waxed paper and refrigerate until ready to use.
  • Just before sautéing, roll the patties lightly in the flour. Shake off excess flour. Place butter and oil in a skillet and set over moderately high heat. When you see the butter foam begin to subside, sauté the patties for 2 to 3 minutes or more each side, to desired doneness. Remove patties from skillet to warm plate.
  • Pour the fat out of the skillet. Add the liquid and boil it down rapidly, scraping up the coagulated pan juices, until it had reduced almost to a syrup. Off heat, swirl butter by half-tablespoons into the sauce until it is absorbed. Pour the sauce over the hamburgers and serve.
  • Makes 6 burgers.
I served this with some fresh spinach that I cooked on medium heat with garlic, a dash of salt and pepper, and a 1/2 tsp of olive oil.  Delicious!

Also, feel free to eat this on a bun.  Kyle loved it that way.  For me, since the weather has been a bit warmer, and this is already a tad on the rich side, I didn't want to weigh myself down with the bread.

**Please note:  your sauce should be the color of caramel if you use white wine.  My sauce began to separate at the time of this picture because I fed my family and waited to take the photo (for those of you that have hungry people demanding immediate nourishment at dinnertime, I'm sure you understand.)

Tuesday, July 10, 2012

Pancakes!


My little one LOVES pancakes.  She also loves helping me make this delicious, fool-proof pancake mix (Nigella inspired of course) that we always have on hand.  It's a great stand-by for when you're too tired to think of something exciting to make, or when you're trying to get your peanut to eat when they've been on a hunger strike.  Plus, it really does make some of the best darn pancakes you'll ever, ever have.

Pancake Mix

You'll need:
  • 4 cups flour
  • 3 tablespoons baking powder
  • 2 teaspoons baking soda
  • 1 teaspoon salt
  • 2 tablespoons plus 2 teaspoons sugar
Instructions:

Mix all of the above ingredients, and store in a jar or air tight container.

To make the pancakes:

You'll need:
  • 1 cup pancake mix
  • 1 tsp vanilla extract
  • 1 cup milk (it doesn't matter if it's skim, whole, or low-fat)
  • 1 large egg
Instructions:
  • In a large bowl, combine and whisk ingredients.
  • Heat a skillet to medium heat.
  • Spray with cooking spray.
  • Using a small ladel, ladel a few sponfuls onto the skillet.  Try to keep the ladeled pancake batter from touching.  (It will taste fine, it just won't be as pretty)
  • When you see bubbles forming on the pancake, it's time to flip!
  • The pancake will rise a bit from the skillet when it's done.  Keep in mind that it's already mostly cooked when you're flipping it, so you shouldn't need to leave it much longer than a minute. 
Serve and enjoy!

**This recipe is also great if you substitute the vanilla extract with lemon or orange extract, and if you like them, add a few poppy seeds!


Tuesday, June 26, 2012

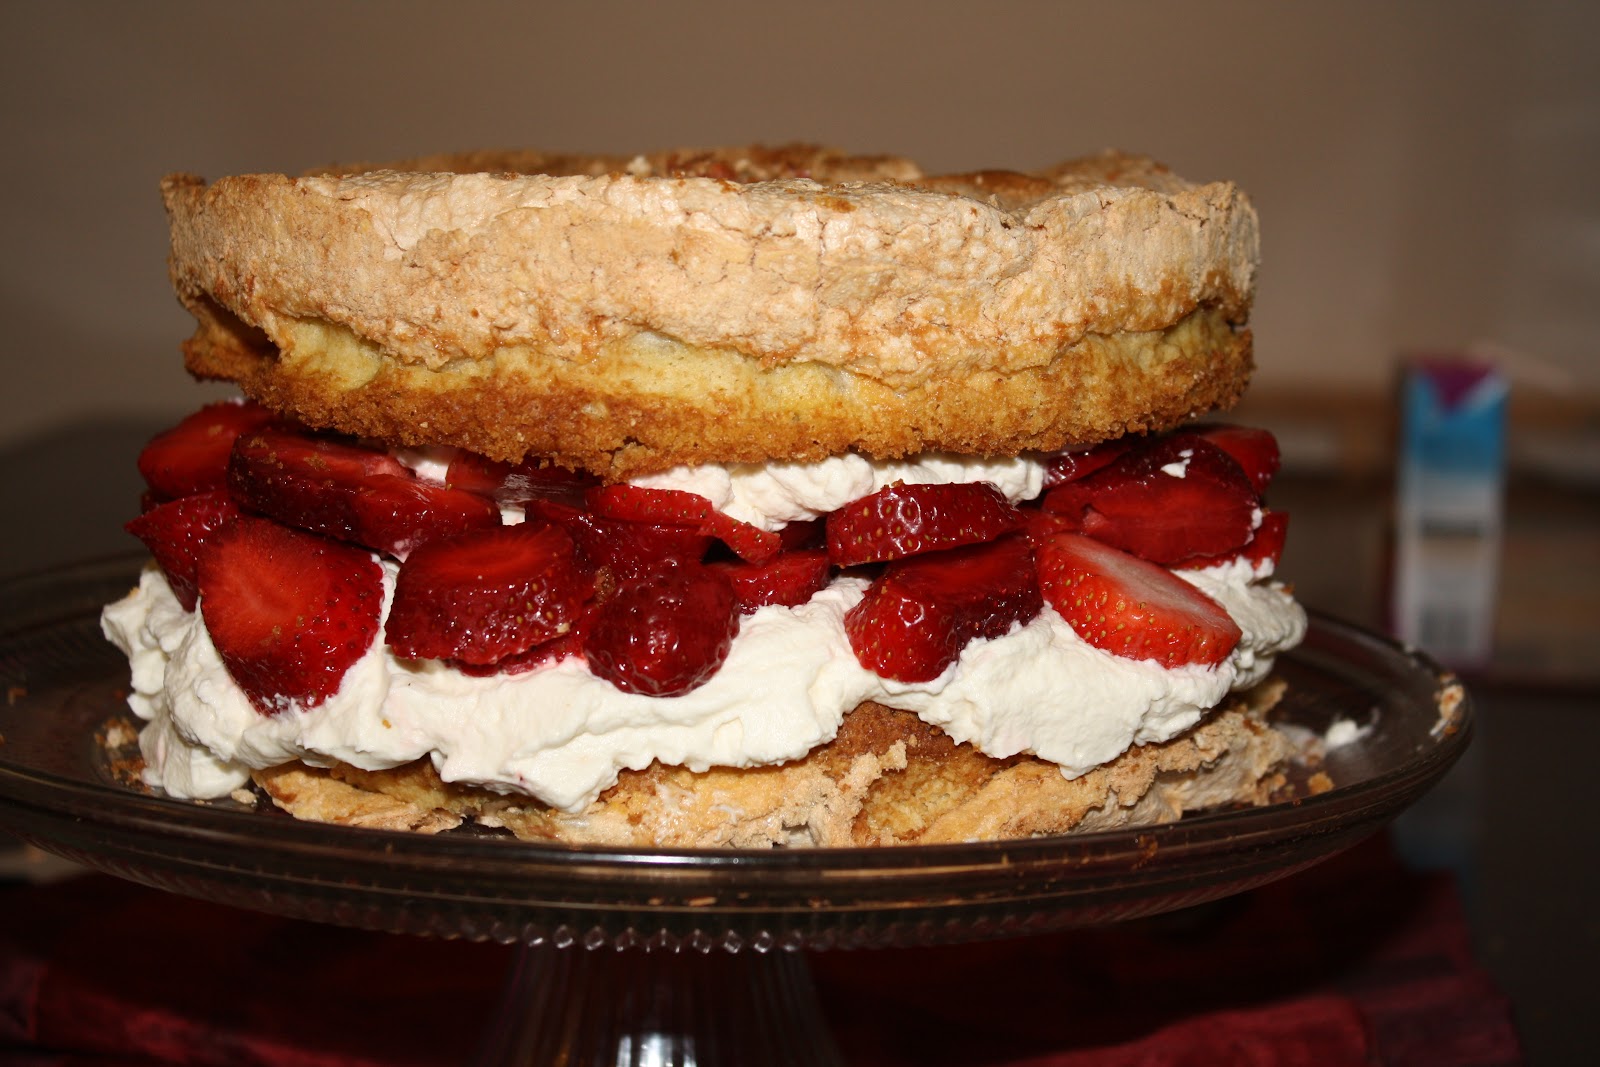
Strawberry Meringue Layer Cake


I'm going to tell you straight up, this is not your Mama's strawberry shortcake.  It's better.  Like, 'he's going to ask you to marry him after eating this' kind of good.  And trust me, I will warn you, once you eat this cake, there is no going back with normal old shortcake ever again.

No, this cake is not low-fat, but it is a fantastic treat.  It is much, much easier than it's fancy meringue exterior let's on, and is a hit at family dinners and parties.  Make the cake, screw the extra calories that day, and enjoy!


You'll need:

- 1 cup all-purpose flour
- 3Tb cornstarch
- 1 1/2 tsp baking powder
- Scant 1/2 cup very soft unsalted butter
- 1 cup granulated sugar
- 4 eggs
- 2 tsp pure vanilla extract
- 2Tb milk
- Scant 1/4 cup slivered almonds (I skipped the almonds bc Ky is not a fan)
- 1 1/2 cups heavy cream
- 1/2 pint strawberries

Instructions:
1.  Preheat the oven to 450-degrees fahrenheit
2.  Line, butter and flour two 9-inch springform pans. (I used two 9" cake pans because our springform pans are in storage.  They worked out fine.)
3.  Combine the flour, cornstarch and baking powder in a bowl.
4.  Separate the eggs and beat the yolks into the butter and sugar, saving the whites to whisk later.  Gently fold in the measured-out dry ingredients, add the vanilla, and then stir in the milk to thin the batter.  Divide the mixture between the two prepared pans.
5.  Whisk the egg whites until soft peaks form, then gradually add the remaining sugar.  Spread a layer of meringue on top of the cake batter in each pan, and sprinkle the almonds evenly over.
6.  Bake for 30-35 minutes, by which time the top of the almonds-scattered meringues will be a dark gold.  Let the cakes cool in their pants, then spring them open at the last minute when you are ready to assemble the cake.
7.  Whip the cream, and hull and slice the strawberries; that's to say, the bigger ones can be sliced lengthwise and the smaller ones halved.  Invert one of the cakes on to a plate or cake stand so that the cake crumb is uppermost.  Pile on the cream and stud with the strawberries, letting some of the berries subside into the whipped whiteness.  Place the second cake on top, meringue upward, and press down gently, just so secure it.
8.  If you've got any more strawberries in the house, hull and halve them, and serve them in a dish on a table to eat alongside.
Serves 8.
**You can also use other types of berries if you prefer.


Friday, June 8, 2012

Yogurt Cake by Ms. Independent


I recently read the book, "Bringing Up Bebe", by Pamela Druckerman.  She's an American married to an Englishman, living in Paris with her three children.  It's really interesting to see how she takes the American"isms" that she grew up with and molds them with the French way of parenting.  Some of the main tenants of French parenting are teaching children balance, independence, and boundaries at an early age so that they are more confident and capable as they get older.  This is not always the American way of doing things, but it was very interesting to read about these independent, well behaved little people that aren't overweight and pigging out at their whim.  Instead, they are taught through gentle firmness and repetition that some things, such as when the family eats is when the family eats, is the way things are.  Children are brought into the world to be a part of it, instead of grown-ups revolving around their children.

I'm not going to get into my personal views on child-rearing and the American versus the French ideal, but I will definitely get behind teaching children new skills, such as how to make a yogurt cake all by themself.  I will also fully advocate keeping children (and adults for that matter) on a normal meals schedule- breakfast, lunch, snack, dinner.  It teaches self control at an early age, and let's face it, learning to wait at an early age- even for your food, is probably one of the more important lessons in life.  In  a world of instant gratification, our kids (and let's face it, a lot of adults), are suffering from obesity.  I'm not telling you to take the cake away, I'm telling you to give a moderate slice at snacktime.

For the last few months, Laela has wanted to help more and more in the kitchen. I started small at first- adding the veggies to salad, sprinkling cheese on tacos and spaghetti, and holding the mixer while making a cake or cookies. Then she wanted to beat the eggs for breakfast, so I started giving her little jobs, like pulling the thyme leaves from the stalk and then beating them in with eggs and veggies for a yummy frittata.

Laela has learned that she can do something really cool- cook!  I let her use the big girl spatula to flip the eggs, and now, she has learned to make her own cake!  The proud look of satisfaction when she made her cake was one I'll never forget.

The first time we made it was on a rainy day with Laela's best friend Bailey.  The recipe calls for full-fat yogurt, but I couldn't find any, so we used low-fat.


Yogurt Cake

You'll need:
  • 2 six-ounce containers plain whole-milk yogurt (use the empty containers to measure the other ingredients)
  • 2 eggs
  • 2 containers sugart (or just one, depending on how sweet you like it)
  • 1 teaspoon vanilla
  • Just under one container vegetable oil
  • 4 containers flour
  • 1 1/2 teaspoons baking powder
  • 2 containers of frozen berries or chocolate chips
  • Creme fraiche (optional)
Instructions:
  • Preheat oven to 375- degrees farenheit.
  • Use vegetable oil to grease a 9" round cake pan or a loaf pan.
  • Gently combine the yogurt, eggs, sugar, vanilla, and oil.
  • In a separate bowl, mix the flour and baking powder.
  • Add the dry ingredients to the wet ingredients.  Mix gently until well combined. (Don't overmix.)
  • You can add 2 containers of frozen berries, a container of chocolate chips, or any flavoring you like.
  • Bake for 35 minutes, then five minutes more if the cake doesn't pass the knife test.  Bake for five more minutes if the cake doesn't pass the knife test.  It should be almost crispy on the outside, but springy on the inside.
  • Let it cool.
  • The cake is delicious served with (or in Laela and Bailey's case spread), with creme  fraiche.
Notes:
  • The first time that you make this, lay towels on the table to easily soak up any mess.
  • Do your best not to help.  This is a pretty fool-proof recipe.  Yes, you should be standing there if they need you, but by 3 years old (Laela will be 3 in September), they probably understand 4 scoops of the ingredient your putting in front of them.  For me, this was one of those proud mama moments, because I got to see Laela do it on her own and really get it.  The girls both did an amazing job!
  • When we made this the first time, I foolishly didn't take our higher altitude into account.  The cake seemed done, but when we took it out, the center was stone raw.  (I cut the cooked part off, dumped the remainder in the still hot pan, and baked it for ten more minutes.)  After baking it some more, and molding it together, it was perfect, but it wasn't as pretty as it should have been:


Bailey was a definite fan though:

  • That said, if you are in a high climate, preheat the oven to 375. 
  • When you put the cake in the oven, bring the heat down to 350.
  • Bake for 40-45 minutes.  If the cake is still gooey inside, bake for five more minutes.
  • Enjoy!
  • **And take lots of pictures!  This is a lot of fun!

Wednesday, April 4, 2012

Nuggets!


I think one of the number one foods that come to mind when I think of toddlers, is chicken nuggets.  I can't tell you how many of my friends always have them stocked in their freezer.  They're quick, simple, and yes, toddlers love foods that they can dip.  Here's my only issue with the premade ones- they aren't always chicken breast (sometimes they are chicken parts- EW), and they are packed with salt.

Laela is a chicken nugget lover.  She loves them grilled, baked, fried, spicy or sweet.  She'll eat them cold or hot.  This nugget recipe is such a hit, even my husband will take them into work and eat them cold for lunch.  They're also great tossed into a salad, or stuffed into a wrap.

The best part?  They're simple to make, easy to freeze, and taste great reheated in the oven- just like the premade ones.


Chicken Nuggets
makes about 50 nuggets

You'll need:
  • 2 large chicken breasts
  • 1 cup breadcrumbs
  • 1 egg
  • 1/2 cup milk (any type is fine)
  • Salt and pepper
  • 2 Sprigs rosemary, chopped
  • 2 Sprigs thyme (leaves only)
  • Olive oil
Instructions:
  • In a medium sized bowl, whisk together the egg and milk, with a dash of salt and pepper.
  • In another medium sized bowl, stir the breadcrumbs, rosemary, thyme, with a dash of salt and pepper.
  • Place a large piece of plastic wrap on the counter.  After cutting off all of the fat from the chicken, place the chicken on the plastic wrap.
  • Place another piece of plastic wrap on top of the chicken breast.
  • Pound the chicken breast with a meat tenderizer until about 1/4 inch thick.
  • Using scissors, cut the breast into 3-4 long strips, about 2 inches wide.  Then, cut each strip into nuggets, making them about 1-2 inches long, depending on how big you want to make them.
  • Preheat a medium skillet to medium heat.  Drizzle a bit of olive oil into the bottom of the pan.
  • Dip the nuggets first into the egg mixture, then into the breadcrumbs.  Make sure the nuggets are well coated in bread crumbs.
  • Place the breaded nuggets into the hot skillet.  Cook for 1/2 to 2 minutes per side, or until the breading looks crisped on each side.
  • Place on a paper towel to soak the oil.
  • **If you make these in batches, make sure to keep adding a bit more oil to the pan.
  • If you are planning to freeze these, let them cool in the fridge first.  Then, wrap them in batches (I wrap them by serving, so I can just pull them out as I need them) using aluminum foil or plastic wrap. (I prefer aluminum foil, so that I can just unwrap it, then bake them off using that foil if it didn't get ripped up when I unwrapped it.)
  • **To reheat after frozen:  You can do this one of two ways.  1.  Let the nuggets defrost overnight, then bake them in an oven at 350-degrees for about 5 minutes, or until crispy.  2.  Take them directly out of the freezer, and bake them in a preheated 350-degree oven for 20-25 minutes, or until crispy.
  • These can freeze in a standard freezer for 3 months.

Monday, April 2, 2012

Springy French Toast


Like many little girls, my daughter loves butterflies!  Since it's officially spring, I thought it would be fun to break out the cookie cutters, and make her some fluttering little french toasts.  I used my vanilla french toast recipe. 

While one side of the french toast cooked, I sprinkled on some pink organic sprinkles (you can use whatever color or type of crystalized sprinkles you'd like), then flipped it over and let them melt into the french toast while the french toast cooked on the opposite side.


When the french toast was done, I used to metal cookie cutters to cut the butterfly shapes out of the cooked french toast. This recipe is pretty sweet, so you really don't need to use syrup or powdered sugar. (Let's face it, this is a special dessert breakfast- not something you should be feeding your adorable little monkey everyday!)

Enjoy!  And be sure to try this with different colors, cookie cutters, or even different textured sprinkles!  When I nannied, I made french toast trucks using blue and green sprinkles, and they came out awesome!

Wednesday, March 28, 2012

Flatbread Pizza Salad

We have a deep affection for whole wheat flatbread in our house.  Laela loves it toasted with olive oil and topped with hummus, and as weird as it may sound to some, steamed broccoli.  Kyle loves it made as a basic pizza with sauce, mozzarella cheese, and whatever kind of meat we have on hand.

My favorite thing to do with flatbread is make what Kyle calls "Flatbread Pizza Salad".  It's super easy to make, and when I have that insatiable craving for pizza, with less of the guilt that tends to come with your typically deliciously greasy slice of tastiness, this is the pizza I turn to.

Flatbread Pizza Salad

You'll need:
  • 1 slice of whole wheat flatbread
  • 1tsp olive oil
  • 3Tb Mozzarella cheese, shredded
  • 2Tb Parmesan Cheese (I prefer freshly shredded)
  • 1 Sprig Thyme (leaves only)
  • 1 Sprig Rosemary (chopped)
  • 3 Slices of roasted peppers, jarred is easier, fresh fine too. (You can also use sundried tomatoes or jarred artichokes)
  • Salt and Pepper
  • 1/2 Lemon
  • 4 large handfuls of spring mix, or 50/50 arugula/spinach mix
Instructions:
  • Preheat your oven to 400-degrees.
  • Use a pastry brush to "paint" the olive oil on both sides of the flatbread. (You may use more or less oil than specified, depending on the size of your flatbread.)
  • Place the oiled flatbread on a cookie sheet.  Put the cookie sheet in the oven for 10 minutes.
  • Chop the roasted peppers.
  • Take the flatbread out of the oven.  Top with the thyme, rosemary, cheeses, roasted peppers, salt, and pepper.
  • Bake for 5 minutes, or until cheese is melted.
  • When cheese is melted, take the flatbread out of the oven.  Slice into servings (our flatbreads usually serve 2 people, unless Kyle is super hungry.)  Top with the salad mix (you can stop here if you're not a salad fan!).
  • Squeeze a bit of lemon onto the salad.  Sprinkle a bit of salt and pepper.
Enjoy!!