Friday, August 31, 2012

Inside Out Burgers


Every now and then, my husband requests a "man meal", where the star of the show is a big slab of meat, preferable smothered in cheese, the only "vegetable" permitted is corn, and the french fries are made by well, alexia.  The reality is, while I make a mean french fry, I packed our mandolin and food processor, and the idea of slicing perfectly even potatoes and then soaking them to release the starches just wasn't doing it for me.  And the truth is, I haven't had a bad Alexia french fry, so I bought Kyle's favorite- the waffle fries.
 
Since we hadn't had burgers in a while, I thought a good old fashioned bacon and cheese inside out burgher was in order.  The picture is deceptive, right?
 
On the outside, it looks like this:


But on the inside:


These burgers look like they're difficult to make, but I promise you, they're super easy. 
 
 
Inside Out Burgers:
makes 4 regular sized burgers
 
You'll need:
  • 1 lb 90/10 ground beef (I prefer grass-fed)
  • 1/4 cup breadcrumbs
  • 1 Egg
  • 1Tb Worcestershire sauce
  • Salt and pepper
  • Onion Powder
  • Garlic Powder
  • 8 slices of cooked bacon (I really like the applewood smoked bacon from Whole Foods butcher counter)
  • 4 slices of colby jack cheese, or whatever cheese you have on hand that melts well
Instructions:
  • Heat a large skillet to medium heat.
  • Spray the pan evenly with cooking spray.  (You can use a few drizzles of olive oil if you prefer.  I experimented with cooking spray, and it turned out great!)
  • In a large bowl, combine the meat, egg, breadcrumbs, onion powder, garlic powder, worcestershire sauce, and a few shakes of salt and pepper.  I mush it all together with my hands.
  • After the mixture is well mixed/mushed together, form 4 patties.
  • Flatten each patty until it is about 1 1/2 to 2 inches thick.
  • Tear the bacon strips in half.  Place them in the middle of the flattened patty. 
  • Fold each cheese slice in half or into 4 squares so that it fits in the middle of the flattened patty with the bacon.
  • Make sure the bacon and cheese leave a ring of meat around them.
  • Gently fold the burger around the bacon and cheese.  This should form a ball. 
  • When it looks like a ball, and no cheese and bacon are showing, gently manipulate the meat into a patty shape.  (It doesn't have to be perfect.  Just try to make sure the cheese and bacon are covered.)
  • Place in the hot pan.
  • Depending on how well you want your burger done, cook it between 2 and 6 minutes per side.  I like my burger Pittsburgh rare, so I tend to raise the heat like a maniac, cook it for one minute per side, and then chow down on that tasty burger like it's my last day on Earth.  The more firm it feels, the more done it is.
  • For the love of all things tasty, do NOT push down on this burger with your spatula.  Don't you like a juicy burger?  Leave it alone.  It's cooking.  Walk away.  Good grief does it drive me crazy when people push the juice out of burgers or slice into them the second they're done cooking.  Ugh.
  • Serve with whatever toppings and buns you enjoy! 
A quick lesson on corn:

Whole sweet corn is one of the most delicious things on the planet.  There are bunches of ways of cooking it, but this is by far the easiest and fool-proof:

Peel all of the husk off.  Rinse off all the stringy stuff that freaks people out.  Toss it in a big soup pot of boiling water (I prefer my water salted) for 10 minutes.

Serve!


Thursday, August 30, 2012

Lemon Garlic Shrimp and Tilapia


One of Laela's favorite foods to eat is shrimp.  With butter, plain, in Chinese food, in scampi, cooked in a crab boil, you name the way it comes (she'll even down them with some spicy cajun seasoning!), and she'll inhale them by the pound.

Since Kyle isn't the biggest shrimp fan in the world, and Laela asked to have shrimp for dinner, I compromised and made some lemon-garlic shrimp and tilapia with broccoli and brown rice.  It was a delicious meal that didn't take a ton of time, and was the perfect combo of being both filling but not heavy so that when we went to the park afterwards, we didn't feel like we were laden down from a huge meal.

Lemon-Garlic Shrimp and Tilapia with Brown Rice and Broccoli

You'll need:
  • 1/2 lb peeled and deveined shrimp (I usually buy frozen by the pound since it's generally cheaper)
  • 4 Tilapia filets, deboned and filleted
  • 4 Cloves garlic, diced
  • 2 Lemons
  • 2 Broccoli Heads, or broccoli florets
  • Brown rice of your choosing (enough to serve 4)
  • Onion Powder
  • Olive Oil
  • Salt and Pepper (to taste)
Instructions:
  • Heat a large skillet to medium heat.
  • Drizzle the skillet with olive oil (a teaspoon or two, enough to make sure the pan is covered so that the fish does not stick to the pan)
  • Slice one lemon into thin slices.
  • Lightly sprinkle the tilapia with onion powder, salt and pepper.
  • Do the same to the shrimp.
  • Place the tilapia and two garlic cloves in the hot pan.  Surround them with the lemon slices.  (Don't overcrowd the pan though.  A few slices will do.)

  • Squeeze lemon juice on top of the fish.  If the fillets are thin, they should take about 2 minutes per side.  With fish, when it is ready, it becomes more white rather than clear white, up the sides.  It also releases itself from the pan when it is ready to be flipped, or is done cooking.
  • Remove the tilapia from heat.  (Fish is flaky when it is done.  If you need a knife at all for tilapia, it's not done cooking.)
  • Place the shrimp and 1 garlic clove in the hot pan, making sure there is enough oil in the pan.
  • Squeeze some lemon on the shrimp and toss in a few lemon slices.
  • Shrimp cook quickly, so when they begin to curl, change color, and look more firm, take them out.
  • Serve with a side of lemon.
For the Broccoli:
  • Heat a medium skillet to medium heat.  Drizzle a small amount of olive oil into the pan.
  • After the pan has heated, add 1 diced garlic clove into the pan.
  • When you can smell the garlic cooking (after about a minute or so), add the broccoli to the pan.
  • Cook for 3-5 minutes.  Broccoli will be tender when ready.
  • Salt and pepper to taste.
  • **If you haven't got any olive oil left, or are trying to be extra healthy, use a few tablespoons of water to steam cook the garlic and broccoli.  Just put the heat to medium high heat with the water in the pan, add the broccoli and garlic.  Pop on the lid.  Lower the heat to medium heat.  Broccoli in 5 minutes!
  • **I squeezed fresh lemon over the entire meal to make it more cohesive, but if you want some components sans lemon, that's totally up to you.
Enjoy!


Tuesday, August 28, 2012

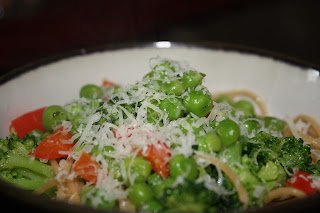
Summer Pasta with Breaded Chicken


If breaded chicken and pasta are not the most toddler friendly- no forget that, everyone friendly foods on the face of the earth, I simply don't know what is.  We don't eat breaded chicken and pasta everyday, but I don't think Laela and Kyle would complain if we did. 

Breaded chicken is easy to make- and easy to ruin.  If you cook it on too high of a temperature, you wind up with burnt chicken on the outside, and oftentimes the chicken will be raw in the center.  If you put chicken in a cold pan that has cold oil in it, the breading will soak up all the oil and won't get the right amount of crunch to it, so you can wind up with a greasy, not-so-delicious mess.  The trick is heating it to medium and not a degree higher, letting the oil get hot in the pan, and putting the breaded chicken in the hot pan, ready to cook itself to perfection.

This particular dish sprung to mind one day when Laela was begging for pasta, Kyle wanted breaded chicken, and all I wanted were some veggies.  It's a happy compromise with a nice, light sauce for a hot summer day.

Summer Pasta with Breaded Chicken

Ingredients:
  • 1lb boneless, skinless chicken breast (If your butcher has cutlets, make your life easier and pick those up)
  • 1 cup breadcrumbs
  • 1 large egg
  • 1/2 cup milk
  • 1 tsp garlic powder
  • 1 tsp onion powder
  • 1 tsp salt
  • 1/2 tsp pepper
  • Pasta of your choosing (we use Barilla Whole Grain Spaghetti- which by the way, they really do use this kind in Italy!  We were just there and it was the only brand in their grocery stores that I'd ever heard of!)
  • 1/2 red pepper, chopped
  • 1 cup frozen peas
  • 2 heads of broccoli or broccoli florets
  • 1/2 cup white cooking wine (or dry white wine)
  • 2 sprigs thyme, leaves only
  • 2 garlic cloves, chopped
  • 1 stalk of rosemary, leaves chopped
  • 1Tb butter
  • 1/2 cup chicken broth
  • Parmesan cheese
Instructions:
  • Put a pot of water on to boil with a few tablespoons of salt.
  • Cook according to instructions.
  • In a medium sized bowl, whisk the egg and milk together.  I sometimes add a dash of salt and pepper to the egg wash for extra flavor.  The salt also helps mix the egg and milk together more efficiently.
  • In another medium bowl, stir together the bread crumbs, garlic powder, salt, and pepper.
  • Make sure that all fat is cut from your chicken.  You can make this easier on yourself by using some really sharp scissors rather than using a knife.
  • Heat a large sized skillet to medium heat.
  • Drizzle about 2 tablespoons of olive oil into the pan.  Your objective is to cover the bottom of the pan with oil. 
  • After about a minute, begin the process of "dredging" the chicken.  First, dip it in the egg wash, then dip it in the breading.  The trick is to keep one hand wet- for dipping in the egg wash, and one hand dry- for dipping in the breading. 
  • Once the chicken has been breaded, place it in the frying pan.  If the chicken is sliced into thin cutlets, cook for 3 minutes per side.  If it is not pounded or sliced thin, it should cook for about 5 minutes per side.  (You will see the chicken begin to looked more "cooked"  up the sides of the chicken.  When you see this, it is time to flip the chicken.  Once you have flipped it, a trick of knowing it is done is pressing on it with a spatula or your finger.  If it is firm, it is done.  Try not to slice into it right away.  You don't want to lose all the yummy juices that make it so delicious!)  Continue this process with the chicken until all of the chicken is cooked.  You can place the chicken on a plate that is lined with paper towel if you would like to soak up some of the oil from the pan.
  • **Make sure to keep an eye on the oil level in the pan.  You want to make sure that there is always a bit of oil to cook the chicken in so that the breading does not burn, so that the breading gets an adequate crisp, and so that the chicken doesn't stick to the pan.
  • Heat a medium sized skillet to medium heat.
  • Add the chopped pepper, garlic, chicken broth, herbs, peas, butter, and broccoli to the pan.
  • Cook for five minutes, stirring occasionally.
  • Raise the heat to medium high. 
  • Add the wine.
  • Keep an eye on the veggies.  Stir regularly to prevent burning.  The wine and broth will bubble violently. 
  • After about two minutes, or when the wine and broth have reduced and thickened, remove from heat.
  • Salt and pepper to taste.
  • Add the pasta to the sauce.  Cook on low heat to mix it all together for one to two minutes.
  • Top with the chicken and a fresh grating of parmesan cheese.
  • Enjoy!


Thursday, August 23, 2012

Spanish Chicken and Beans with Peppers


I love Goya Adobo seasoning.  While I'm not always big on pre-made seasonings, Adobo really is one of my favorites.  It reminds me of when I was in college, and my girlfriends and I would make these huge spaghetti pots of Spanish rice with beans, corn, peppers, and those weird little hot dogs all sliced up (it sounds gross, but oh mama, is that rice amazing) with hot sauce dumped all over it.  Seriously, thinking of that rice makes me salivate--and miss my college friends.

While this isn't the same recipe of my college years (oh yes, I will definitely be sharing that one soon), this recipe is just as good, and much, much quicker to make.  Also, I daresay this recipe is a bit healthier, as there is minimal fat, is packed with fiber, veggies, and protein.  Give this recipe a try.  It's one of the quickest, most flavorful meals you will ever make.  The best part?  If your family doesn't lick their plates and inhale everything you made, the leftovers taste even better the next day.

CaraCakes Spanish Chicken and Beans with Peppers

You'll need:
  • 1 lb chicken breast  (I pound mine 1/2 in thick, and cut it into cubes with scissors)
  • 2Tb Goya Adobo Seasoning
  • 1/2 tsp cayenne pepper
  • 1/4 tsp paprika (you can add more if you like it spicy- I'm the only one in my house who likes spicy food, so I just add more to mine)
  • 1/2 vidalia onion, diced
  • 1/2 red pepper, diced
  • 1 can black beans, rinsed
  • 1 cup chicken broth, or 1 cup water with 1 chicken boullion cube
  • Brown Rice (I used 10 minute Success Precooked Whole Grain Brown Rice)
Instructions:
  • Heat a large skillet to medium heat.
  • Pour 2Tb olive oil into the pan.
  • Once the oil is heated (you can flick water into the pan to check.  If it sizzles, the pan is hot.), add the onions.
  • When the onions are clear, add the red pepper.  Cook for 2 minutes, stirring occasionally.  If the onions or peppers start to stick to the bottom of the pan, add a tablespoon or two of water and scrape the onions and peppers from the bottom of the pan.
  • Boil water, and cook rice according to instructions.
  • Add the chicken, cayenne pepper, paprika, black beans, and broth to the pan with the onions and peppers.
  • Cook for ten minutes, or until the chicken is fully cooked and the sauce has reduced (it will look less like soup and will have thickened a bit.)
  • Serve over rice.
  • Enjoy!

Tuesday, August 21, 2012

A Very Cinnamony Breakfast Bake


    I love a good breakfast bake.  Truthfully, I love anything that I can throw together in five minutes.  This breakfast bake beats all breakfast bakes in that it got me through one of those mornings when I woke up tired and hungry with a hungry, growling family chomping at my heels to make breakfast. All it took was some yummy cinnamon bread from Great Harvest, a quick whisk of egg, milk, vanilla and cinnamon, and 20 minutes in the oven.  What's easier than that?  And how can you ever go wrong with anything cinnamon?
This may not be the sexiest looking breakfast bake, but I promise you, it's delicious.

Cinnamon Bread Breakfast Bake

You'll need:
  • 1/2 loaf of cinnamon bread (I used Great Harvest Multigrain Cinnamon Crunch)
  • 2 tsp vanilla
  • 2 cups milk (I used fat-free)
  • 2 tsp cinnamon
  • 1 large egg
Instructions:
  • Preheat the oven to 375 degrees Fahrenheit.
  • Place the sliced cinnamon bread in a 2 1/2 quart corningware dish or baking pan. (Thick sliced bread is generally preferable, but I only had thin sliced on hand.  I think that worked out better since I didn't have time to let it settle in the mixture for very long.)
  • Whisk the vanilla, egg, milk, and cinnamon in a bowl. 
  • Pour the mixture over the bread. (Try to pour it evenly over all of the bread.)
  • If you have the time, let this sit for 5-10 minutes so that the liquid seeps into the bread.  (If you don't have time, don't worry, it'll still be delicious!)
  • Bake for 20-30 minutes, or until the top is golden brown.
  • **For an extra indulgence, sprinkle 3Tb raw sugar, and 2 tsp cinnamon on top of the breakfast bake for 5 minutes.  It will add a bit of extra sweetness and crunch to the bake.
  • Enjoy!