Showing posts with label easy dinner. Show all posts

Monday, February 4, 2013

Chicken Pot Pie 2

 
Okay, I admit it, we've visited Chicken Pot Pie before.  And yes, that recipe is still one of my favorites.  However, this is the perfect recipe for when you are just too busy to make pie crust, and you want to throw something hearty and healthy together quickly.
 
I apologize for not having a picture of the entire product, but Laela was yanking on my pant leg telling me that she was "STARVING", so chicken pot pie with a hunk cut out is what you get.
 
Easy Chicken Pot Pie (mostly from scratch!)
 
You'll need:
  • 1 sheet of puff pastry
  • 2 chicken breasts (can be leftover from roasted chicken- that's what I used)
  • 2 carrots, chopped
  • 1/2 onion, chopped
  • 2 potatoes, chopped
  • 1 celery stick, chopped
  • 1/2 cup frozen peas
  • 1Tb butter
  • 1Tb flour
  • 1 cup chicken broth/stock
  • 1 sprig rosemary
  • 1 sprig thyme
  • Salt and pepper
Instructions:
  • Preheat your oven to 425-degrees Fahrenheit.
  • Heat a large skillet to medium heat.  Add a few glugs of olive oil.
  • Place the onion, carrots, celery, and potatoes in the pan to cook for about ten minutes.  Stir occasionally.
  • While the vegetables are cooking, heat a medium saucepan to medium-high heat.
  • Add the butter and flour.  Whisk until they are well combined.  Do not allow it to brown. 
  • Pour the chicken stock/broth into the pan with the butter/flour mixture.  Whisk until it thickens to an almost gravy consistency.
  • Mix in the rosemary (I cut my rosemary with scissors to make it nice and easily diced) and thyme leaves.  Add salt and pepper to taste.
  • If using raw chicken, cut it into cubes.  Put it in the pastry dish.
  • Add the cooked vegetables, frozen peas, and the chicken stock/broth mixture to the pastry pan.  Gently stir the ingredients together.  They'll meld together well while they bake, so don't go overboard trying to mix everything together.
  • Gently unroll the puff pastry over the pastry dish (I usually use a pie pan, but you can use anything you like- corning ware is great for this).  Gently pinch the sides so that they adhere to the dish.  If you have any leftover dough, hand it over to your little one to make fun shapes, and then top the pastry with the shapes.
  • If you want to it to have a rich golden texture, use a pastry brush to paint the pastry with an egg wash (1 egg that's been beaten with 3 tablespoons of water).
  • Bake for 30 minutes.
  • Enjoy!

Tuesday, October 2, 2012

Fall Crock Pot Brisket


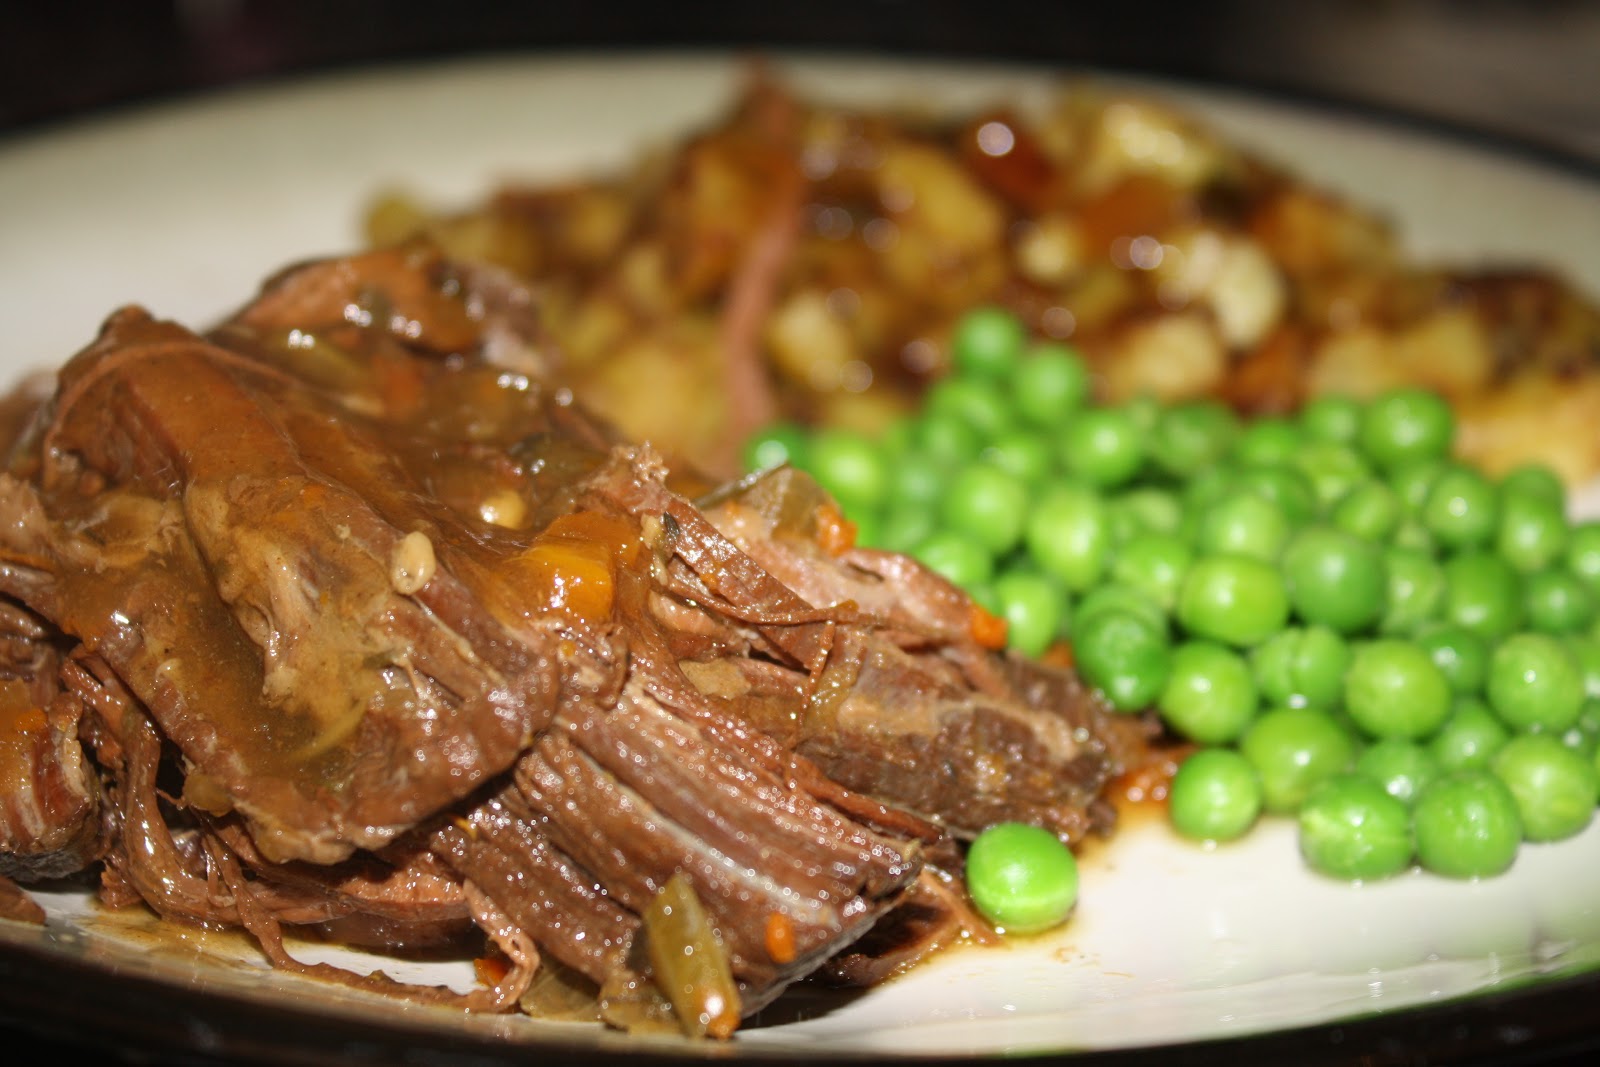
Brisket is hands down one of my favorite foods.  There's something so homey about a well made brisket.  Maybe it's because it reminds me of cooler weather and happy holidays with our friends Ellyn and Leon and their family.  Isn't that what comfort food is all about- food that warms us, satiates us, and reminds us of happy times with people that we love?
 
 
This is not a difficult meal to make.  In fact, it's kind of perfect in it's simplicity since you just toss all the ingredients in the crock pot, and leave it alone until the brisket is falling apart and your house is filled with the savory, hearty flavors of carrots, onions, herbs, and beef at its finest.  Laela had a great time helping "shake shake shake" the spices in, as well as tossing in the veggies.
 
Fall Crock Pot Brisket
 
Ingredients:
  • 2 lb Brisket
  • 1 Medium onion, diced
  • 3 Large carrots, chopped
  • 2 stalks celery, chopped
  • 1 Stalk thyme (leaves only)
  • 1 Stalk rosemary, chopped (leaves only)
  • 4 Leaves of sage, chopped
  • Salt and Pepper
  • 2 Cups beef broth
  • 2 Tb Worcestershire sauce
  • 2 tsp Balsamic vinegar
  • 4 garlic cloves, finely chopped
  • 3 Potatoes, chopped or cubed (optional)
  • 1 Tb Corn starch
Instructions:
 
For the Brisket:
  • Place the brisket, onion, garlic, worcestershire, balsamic vinegar, carrots, celery, thyme, rosemary, sage, potatoes, and broth in the crock pot.
  • Cook on the lowest setting (but not on warm) for 6-10 hours, or until the brisket is falling apart when you place a fork in it (brisket will "string" and "pull" apart.)
  • Serve as is, or with gravy.
For the gravy:
  • Take 1 cup of the drippings/broth from the crock pot and place it in a medium saucepan on medium-high heat.
  • In small ramekin or cup, whisk together 1 tsp corn starch and 2 tsp water.
  • Whisk in the corn starch mixture with the broth/drippings.
  • Taste for seasoning.  Add salt and pepper as necessary.
  • For a gravy with more herb flavoring, whisk in a few chopped leaves of rosemary, thyme, and sage.
  • Whisk until thickened.
  • Serve!
 

Wednesday, September 26, 2012

Spinach and Chicken Casserole

 
With fall upon us, I've begun to crave more soups, comfort foods, and casseroles.  While Kyle was on his last business trip, it was a rainy, chilly week, so I decided to throw together a pretty easy casserole with chicken, multi-grain macaroni noodles, peas and spinach.  It turned out great!  This is definitely one of those dishes that tastes better and more flavorful with each passing day.
 
 
Spinach and Chicken Casserole
 
You'll need:
  • 1 cup frozen spinach
  • 1 cup milk
  • 1 Tb butter
  • 2 Tb flour
  • 1 Tb onion powder
  • 1Tb garlic powder
  • 2 cups peas
  • 2 cooked chicken breasts, chopped
  • 2 sprigs thyme
  • 1 spig rosemary, chopped
  • 1/4 cup breadcrumbs
  • Salt and pepper
Instructions:
  • Preheat your oven to 350-degrees.
  • Cook macaroni noodles as instructed on box.  (I prefer whole grain or whole wheat noodles.)
  • Heat a medium saucepan to high heat.
  • Whisk 1 Tb butter and flour into a paste in the heated pan.
  • Whisk milk into butter and flour paste.
  • Whisk in the rosemary, thyme, onion and garlic powder.
  • When the mixture becomes creamy, whisk in the spinach.
  • Salt and pepper the sauce to taste.
  • When the noodles are done cooking, drain them.  Then, pour them into a 2 1/2 quart corningware or baking pan.
  • Add the peas and chicken to the pan.
  • Pour the sauce over the noodles, peas, and chicken. 
  • Stir to combine ingredients.
  • Place pan in the preheated oven.
  • Cook for 15 minutes.
  • In a small bowl, mix 1 Tb butter with breadcrumbs (I stir them together with a fork.)
  • Sprinkle the bread crumb mix over the casserole.
  • Cook for 10 minutes, or until the breadcrumbs are golden brown and the casserole bubbles.
  • Enjoy!
 

Thursday, August 30, 2012

Lemon Garlic Shrimp and Tilapia


One of Laela's favorite foods to eat is shrimp.  With butter, plain, in Chinese food, in scampi, cooked in a crab boil, you name the way it comes (she'll even down them with some spicy cajun seasoning!), and she'll inhale them by the pound.

Since Kyle isn't the biggest shrimp fan in the world, and Laela asked to have shrimp for dinner, I compromised and made some lemon-garlic shrimp and tilapia with broccoli and brown rice.  It was a delicious meal that didn't take a ton of time, and was the perfect combo of being both filling but not heavy so that when we went to the park afterwards, we didn't feel like we were laden down from a huge meal.

Lemon-Garlic Shrimp and Tilapia with Brown Rice and Broccoli

You'll need:
  • 1/2 lb peeled and deveined shrimp (I usually buy frozen by the pound since it's generally cheaper)
  • 4 Tilapia filets, deboned and filleted
  • 4 Cloves garlic, diced
  • 2 Lemons
  • 2 Broccoli Heads, or broccoli florets
  • Brown rice of your choosing (enough to serve 4)
  • Onion Powder
  • Olive Oil
  • Salt and Pepper (to taste)
Instructions:
  • Heat a large skillet to medium heat.
  • Drizzle the skillet with olive oil (a teaspoon or two, enough to make sure the pan is covered so that the fish does not stick to the pan)
  • Slice one lemon into thin slices.
  • Lightly sprinkle the tilapia with onion powder, salt and pepper.
  • Do the same to the shrimp.
  • Place the tilapia and two garlic cloves in the hot pan.  Surround them with the lemon slices.  (Don't overcrowd the pan though.  A few slices will do.)

  • Squeeze lemon juice on top of the fish.  If the fillets are thin, they should take about 2 minutes per side.  With fish, when it is ready, it becomes more white rather than clear white, up the sides.  It also releases itself from the pan when it is ready to be flipped, or is done cooking.
  • Remove the tilapia from heat.  (Fish is flaky when it is done.  If you need a knife at all for tilapia, it's not done cooking.)
  • Place the shrimp and 1 garlic clove in the hot pan, making sure there is enough oil in the pan.
  • Squeeze some lemon on the shrimp and toss in a few lemon slices.
  • Shrimp cook quickly, so when they begin to curl, change color, and look more firm, take them out.
  • Serve with a side of lemon.
For the Broccoli:
  • Heat a medium skillet to medium heat.  Drizzle a small amount of olive oil into the pan.
  • After the pan has heated, add 1 diced garlic clove into the pan.
  • When you can smell the garlic cooking (after about a minute or so), add the broccoli to the pan.
  • Cook for 3-5 minutes.  Broccoli will be tender when ready.
  • Salt and pepper to taste.
  • **If you haven't got any olive oil left, or are trying to be extra healthy, use a few tablespoons of water to steam cook the garlic and broccoli.  Just put the heat to medium high heat with the water in the pan, add the broccoli and garlic.  Pop on the lid.  Lower the heat to medium heat.  Broccoli in 5 minutes!
  • **I squeezed fresh lemon over the entire meal to make it more cohesive, but if you want some components sans lemon, that's totally up to you.
Enjoy!


Tuesday, August 28, 2012

Summer Pasta with Breaded Chicken


If breaded chicken and pasta are not the most toddler friendly- no forget that, everyone friendly foods on the face of the earth, I simply don't know what is.  We don't eat breaded chicken and pasta everyday, but I don't think Laela and Kyle would complain if we did. 

Breaded chicken is easy to make- and easy to ruin.  If you cook it on too high of a temperature, you wind up with burnt chicken on the outside, and oftentimes the chicken will be raw in the center.  If you put chicken in a cold pan that has cold oil in it, the breading will soak up all the oil and won't get the right amount of crunch to it, so you can wind up with a greasy, not-so-delicious mess.  The trick is heating it to medium and not a degree higher, letting the oil get hot in the pan, and putting the breaded chicken in the hot pan, ready to cook itself to perfection.

This particular dish sprung to mind one day when Laela was begging for pasta, Kyle wanted breaded chicken, and all I wanted were some veggies.  It's a happy compromise with a nice, light sauce for a hot summer day.

Summer Pasta with Breaded Chicken

Ingredients:
  • 1lb boneless, skinless chicken breast (If your butcher has cutlets, make your life easier and pick those up)
  • 1 cup breadcrumbs
  • 1 large egg
  • 1/2 cup milk
  • 1 tsp garlic powder
  • 1 tsp onion powder
  • 1 tsp salt
  • 1/2 tsp pepper
  • Pasta of your choosing (we use Barilla Whole Grain Spaghetti- which by the way, they really do use this kind in Italy!  We were just there and it was the only brand in their grocery stores that I'd ever heard of!)
  • 1/2 red pepper, chopped
  • 1 cup frozen peas
  • 2 heads of broccoli or broccoli florets
  • 1/2 cup white cooking wine (or dry white wine)
  • 2 sprigs thyme, leaves only
  • 2 garlic cloves, chopped
  • 1 stalk of rosemary, leaves chopped
  • 1Tb butter
  • 1/2 cup chicken broth
  • Parmesan cheese
Instructions:
  • Put a pot of water on to boil with a few tablespoons of salt.
  • Cook according to instructions.
  • In a medium sized bowl, whisk the egg and milk together.  I sometimes add a dash of salt and pepper to the egg wash for extra flavor.  The salt also helps mix the egg and milk together more efficiently.
  • In another medium bowl, stir together the bread crumbs, garlic powder, salt, and pepper.
  • Make sure that all fat is cut from your chicken.  You can make this easier on yourself by using some really sharp scissors rather than using a knife.
  • Heat a large sized skillet to medium heat.
  • Drizzle about 2 tablespoons of olive oil into the pan.  Your objective is to cover the bottom of the pan with oil. 
  • After about a minute, begin the process of "dredging" the chicken.  First, dip it in the egg wash, then dip it in the breading.  The trick is to keep one hand wet- for dipping in the egg wash, and one hand dry- for dipping in the breading. 
  • Once the chicken has been breaded, place it in the frying pan.  If the chicken is sliced into thin cutlets, cook for 3 minutes per side.  If it is not pounded or sliced thin, it should cook for about 5 minutes per side.  (You will see the chicken begin to looked more "cooked"  up the sides of the chicken.  When you see this, it is time to flip the chicken.  Once you have flipped it, a trick of knowing it is done is pressing on it with a spatula or your finger.  If it is firm, it is done.  Try not to slice into it right away.  You don't want to lose all the yummy juices that make it so delicious!)  Continue this process with the chicken until all of the chicken is cooked.  You can place the chicken on a plate that is lined with paper towel if you would like to soak up some of the oil from the pan.
  • **Make sure to keep an eye on the oil level in the pan.  You want to make sure that there is always a bit of oil to cook the chicken in so that the breading does not burn, so that the breading gets an adequate crisp, and so that the chicken doesn't stick to the pan.
  • Heat a medium sized skillet to medium heat.
  • Add the chopped pepper, garlic, chicken broth, herbs, peas, butter, and broccoli to the pan.
  • Cook for five minutes, stirring occasionally.
  • Raise the heat to medium high. 
  • Add the wine.
  • Keep an eye on the veggies.  Stir regularly to prevent burning.  The wine and broth will bubble violently. 
  • After about two minutes, or when the wine and broth have reduced and thickened, remove from heat.
  • Salt and pepper to taste.
  • Add the pasta to the sauce.  Cook on low heat to mix it all together for one to two minutes.
  • Top with the chicken and a fresh grating of parmesan cheese.
  • Enjoy!


Wednesday, October 12, 2011

Crock Pot Chicken

I've been craving some chicken with salsa, so I decided to "food-speriment"  I put two large, boneless, skinless chicken breasts in the crock pot on low, with some black beans(as much as you like), chunky tomato salsa (about a half a jar-4-5 oz or so), kidney beans (as much as you like), and a half cup of chicken broth.  I served it with some basmati rice with a bit of shredded cheese, and wala!  Dinner was ready!

Super delicious!  Try it!

**Optional:  You can "pull the the chicken" and put the chicken with salsa and beans in taco shells/tortillas.  It's also great served with tortilla chips.

Sunday, October 9, 2011

A Simple Brisket

I don't know about you, but pulled meats are one of my most favorite things ever- pulled pork, brisket that you don't even need to pull because it's been cooked low and slow, pulled chicken, there's something about that shredded goodness that just makes me happy.  I think the main reason I love it so much is because it is just so stinking easy.

In keeping with my crock pot recipes that I've promised, here's the easiest (and I do mean easiest) brisket recipe you will ever make.  Yes, I said ever, and I totally mean, wholeheartedly, that a blind man with one hand could make this dinner.

Crock Pot Brisket
You'll need:
  • 2 lb Brisket (Don't trim the fat, it keeps it super juicy.  Remove the fat with a slotted spoon when it's done cooking.)
  •  Beef Broth-3 cups, or just enough to cover the brisket (or water with beef boullion cubes, whatever you have on hand)
  • 2Tb garlic powder
  • 2Tb onion powder
  • 2Tb ground black pepper
  • 3Tb salt (I used sea salt, and added more to taste)
  • 1Tb ground coffee
  • 1Tb brown sugar
  • 1tsp paprika
  • 3 leaves of sage, finely chopped
Instructions:

Put all of the ingredients in the crock pot.   Set the crock pot to the lowest setting. Cook either overnight, or start it in the morning and enjoy for dinner that day! 

**This freezes really well.  Put in tupperware and pop it in the freezer.  It'll be good for about three months, depending on how cold your freezer is (if you have a deep freeze it can last longer!)

Monday, October 3, 2011

Pulled Pork

We learned pretty quickly that barbecue is a religion in South Carolina.  South Canrolina's barbecue is mustard based (and if it's done right it is crazy delicious!), so if you have the opportunity to try it, definitely give it a go!

My pulled pork recipe is delicious with any kind of barbecue sauce, so use whatever kind you like best! 

Fair warning, pulled pork enthusiasts that love their pork smoked and made with care, this is a lazy person's recipe.  So if you love pulled pork like we do (my little girl always exclaims "Num Num Mommy!", this recipe is for you!


Pulled Pork

You'll need:
  • 2-3 lb pork butt (I prefer bone in- it packs more flavor!)
  • 6-8 oz barbecue sauce (depending on how barbecue packed you'd like your pork to be)
  • 2 cups water
Instructions:

Set the crock pot to low heat.  Combine ingredients in the crock pot.  Cook for 8 hours (or however long your crock pot setting for low is set for- ours is set to a timer, and clicks off after 8 hours when we cook on low, 5 hours on medium, and 2 hours on high.) 

When the pork is done, use two forks to "pull" the pork. It should pull rather easily (use one fork to hold the pork in place, use another one to pull or shred the pork with your fork.)  You can take the pork out and do this on a cutting board if you like.  Personally, I like to do it in the crock pot so that I don't make more dirty dishes than necessary, and I like that it soaks up even more juice as you pull the pork!

Enjoy!!

**This is another super easy to freeze dinner.  As with the brisket, it should freeze in a conventional freezer for about 3 months. 

Monday, September 26, 2011

Crock Pot Turkey Meatballs

Ugh.  Our laptop exploded.  Therefore, until we get a new laptop, there will be no pictures on CaraCakes.

Anyway, I promised some seriously awesome recipes this week, so let's get to it.

Who doesn't love meatballs?  Okay, vegetarians.  Vegetarian friends, try this with veggie crumble or ground tofu.  And double your seasonings. 

Crock Pot Meatballs

You'll need:
  • 1lb ground turkey (I get the butcher to give me a mix of 85/95- otherwise it'll be too dry if you use all white turkey.)
  • 2 cups pasta sauce
  • 1/2 cup chicken/beef/veg stock
  • 2 bulbs garlic, crushed
  • 1 cup parmesan cheese
  • 1/2 cup romano
  • 1 cup breadcrumbs
  • 1 egg
  • Dash of salt and pepper
  • 1tsp onion powder
  • 1 tsp garlic powder
Instructions:
  • In a large bowl, combine your meat, egg, onion powder, garlic powder, salt and pepper, romano, parmesan, and breadcrumbs.  Squish all of the ingredients together with your hands.
  • Form the meat mixture into balls (try to make them the same size).  If it feels to dry, add a bit of water to make it easier to mold.
  • Turn the crock pot on low heat.
  • Pour the pasta sauce and broth into the crock pot.
  • Add the crushed garlic.  (you can add extra if you're a huge garlic lover.)
  • Add the meatballs.
  • This is a great meal to start in the morning, as it will be ready by dinner!
  • Serve with pasta, on a roll, or on their own!
*This is another easy to freeze dinner.  You can freeze them with or without sauce.
*Tip- If you like crispy meatballs (we really do!) bake them for about ten minutes on a greased baking sheet at 400-degrees before you put them in the crock pot.

Enjoy!!

Monday, August 29, 2011

Simply Superb Shrimp Scampi


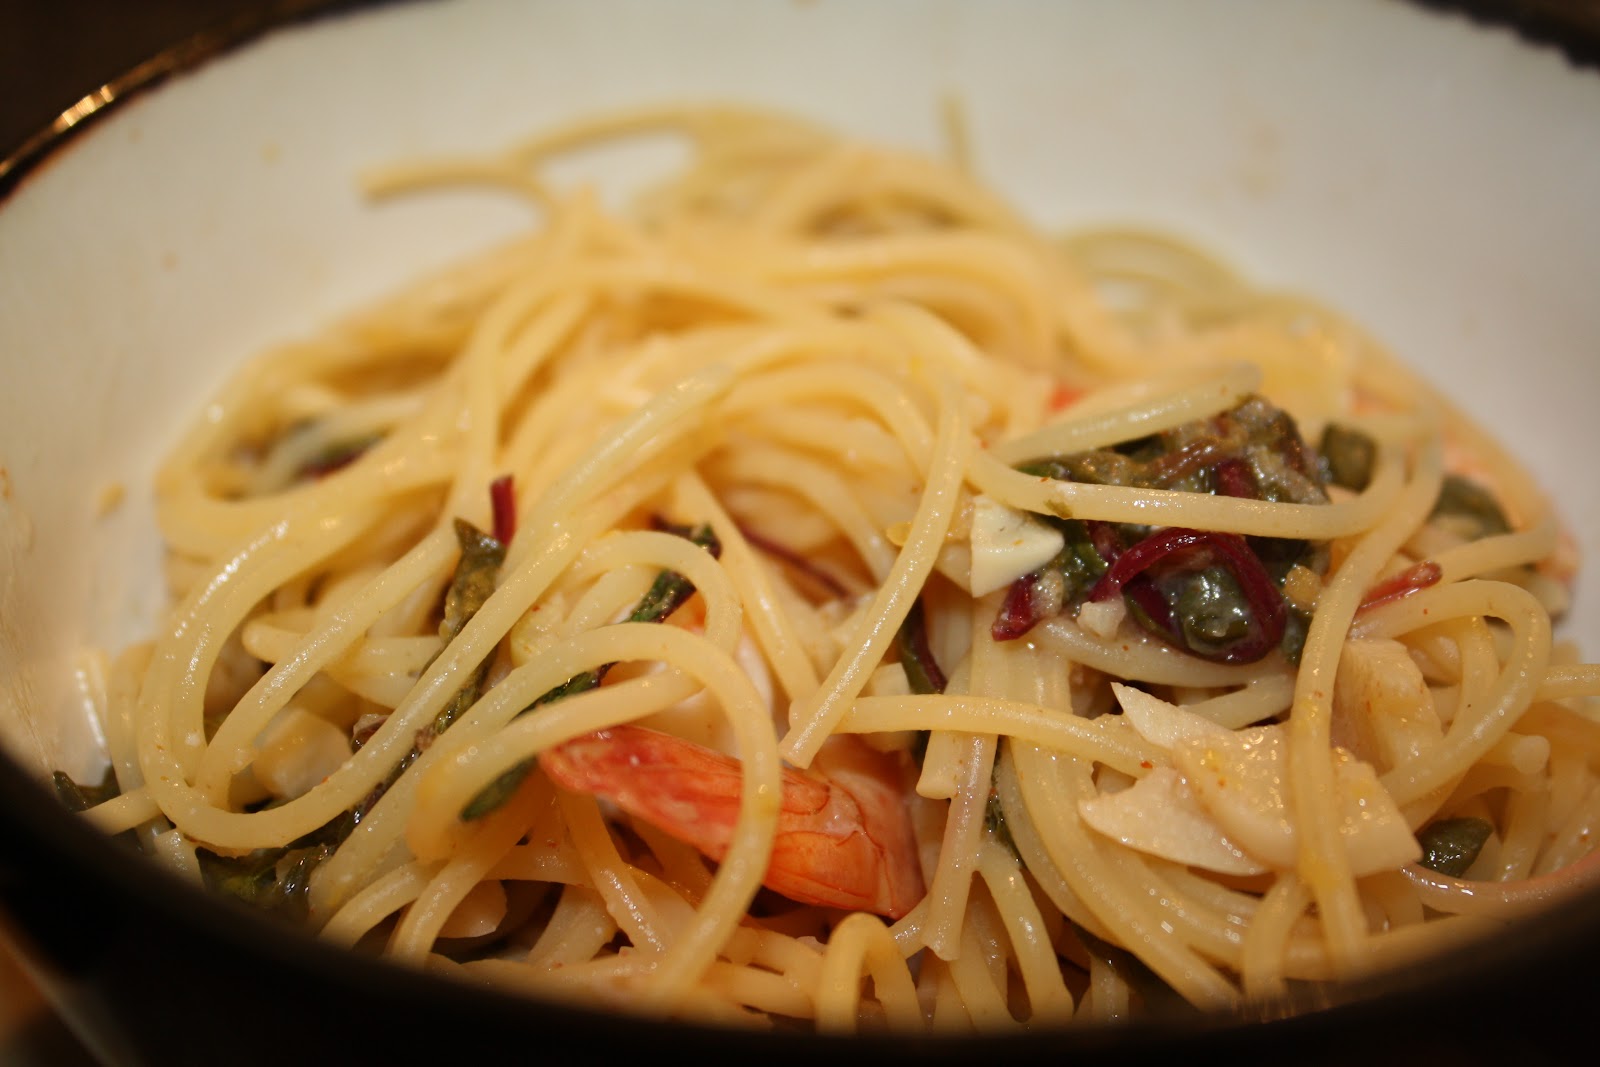
Sometimes I find really amazing recipes at the strangest of places.  The other day, my friend Colleen and I went food shopping at Whole Foods (yes, she was brave and went shopping with Laela and I), and wound up talking to the samples woman.  She made shrimp scampi- which I generally can't stand, and made it light and lemony- not heavy, buttery and cloying like I often find shrimp scampi to be.  It was so good, I bought a pound of shrimp and all of the ingredients that she recommended.  We had it for dinner that night, and, in the words of Laela: "MMMMMM!  Yummy!  Delicious Mama!!"  Make this.  It's super simple and absolutely fantastic.


Shrimp Scampi
serves 4-6

You'll need:
  • 1 lb peeled and deveined shrimp (I used frozen peeled and deveined shrimp, they only take a minute or two extra to cook.)
  • Juice and zest of 2 lemons (preferably Meyer lemons)
  • 6 cloves garlic
  • 1/2 stick butter
  • 1/2 bag baby red and green chard, cleaned and rinsed (you can add more if you like.)
  • 1/2 cup white wine
  • Pinch cayenne pepper (I added a little more than a pinch because we like a little kick.)
  • Salt to taste
  • Chopped Italian parsley
Instructions:
  • Finely chop the garlic.
  • Melt the butter over medium low heat.  Saute the garlic gently until very fragrant.
  • Add the wine and lemon juice and raise the heat to medium high.
  • Reduce the wine mixture by half, and add a pinch of cayenne pepper.
  • Add the baby chard and cook briefly.
  • Add the shrimp and cook just until done, 3-4 minutes. (They'll turn from clear to pinkish-white)
  • Add the chopped parsley and lemon zest.
  • You can serve this as is, or add cooked pasta to the mix so that it can seep up all of the delicious sauce.
Enjoy!!

Monday, August 15, 2011

Roast This!


One of my absolute favorite foods is roasted chicken.  This time last year, I wrote a post called Perfect Roast Chicken.  Today's recipe is very similar.  The only difference is that I took the extra time to make a brine to marinate the chicken.  This packs the chicken with even more flavor, and keeps the chicken extra moist (especially when you're cooking it with the idea that it will be reheated).

Briny Roasted Chicken

For the Brine:
  • 1/4 cup kosher salt
  • 4 cups water
  • 1Tb cloves
  • 1Tb cracked pepper
  • 3 garlic cloves
  • 1/2 tsp paprika
  • 1 tsp onion powder
For the Chicken:
  • 1 approx. 3 1/2 lb roasting chicken
  • 1 lemon
  • 2 carrots
  • 2 celery stalks
  • 1 large onion
  • 1 small bunch of rosemary, thyme, and/or sage
  • 1 bulb garlic
  • Olive Oil
  • Salt and pepper
Instructions:

To make the brine:
  • In a large soup pot, combine the water and all of the ingredients.
  • Bring to a boil.
  • Simmer for ten minutes.
  • Take off the heat.
  • When room tempurature, place the chicken in the brine.  You can brine it for 20 minutes to 1 hour.

To prep your chicken:
  • Preheat your oven to 475 degrees.
  • There's no need to peel the vegetables- just give them a wash and roughly chop them.
  • Break the garlic bulb into cloves, leaving them unpeeled.
  • Pile all the vegetables and garlic into the middle of the large roasting pan and drizzle with olive oil. (The chicken roasts on top of the vegetables.)
  • Take the chicken out of the brine.
  • Dab it dry with a paper towel.
  • Drizzle the chicken with olive oil and season well with salt and pepper, rubbing it all over the bird.
  • Carefully prick the lemon all over, using th tip of a sharp knife (if you have a microwave, you could pop the lemon in there for 40 seconds at this point as this will really bring out the flavor).
  • Put the lemon inside the chicken's cavity, with the bunch of herbs.
To cook your chicken:
  • Place the chicken on top of the vegetables in the roasting pan and put it into the preheated oven.
  • Turn the heat down immediately to 400 degrees fahrenheit and cook the chicken for 1 hour and 20 minutes.
  • Baste the chicken halfway through cooking and if the vegetables look dry, add a splash of water to the pan to stop them from burning. (Be careful, this may cause the pan to steam up at your face if you're too close to it.)
  • When cooked, take the pan out of the oven and transfer the chicken to a board to rest for 15 minutes or so.
To carve your chicken:
  • Remove any string from the chicken and take off the wings.
  • Cut through the joint and pull the leg off.
  • Repeat on the other side, then cut each leg between the thigh and the drumstick so you end up with four portions of dark meat.
  • Place these on a serving platter.
  • You should now have a clear space to carve the rest of your chicken.
  • Angle the knife along the breastbone and carve one side off, then the other.
  • When you get down to the fussy bits, just use your fingers to pull all the meat off, and turn the chicken over to get all the tasty, juicy bits from underneat. You should be left with a stripped carcass, and a platter full of lovely meat and roasted veggies.

I know that this seems like a labor intensive recipe, but the truth is that the brining really is worth it.  We ate this chicken for four days, and ate it in a different way each time.

The first evening, I made the chicken with the potatoes and carrots.  The second evening, I mixed it with the lentils, chunky tomatoes and beans that I'd had ready in the freezer.  The third day, I made it for lunch.  I shredded some chicken, cut up some tomatoes, and shredded some lettuce and put it in a wrap with some swiss cheese.  On the fourth day, I had it with leftover mashed potatoes from the bangers and mash I'd made for breakfast.

The chicken never got dry, tasted great cold or hot, and froze easily.  Try it!

Friday, August 12, 2011

Bangers and Mash!


I absolutely love a really good dish of bangers and mash.  Usually, I'll have it for dinner, but when I found myself without eggs, I had to think of what would hold Kyle over until dinnertime.  This is a pretty heavy meal, so when you make this, be ready to eat!

Bangers and Mash
You'll need:
  • (3) Small Yukon Gold potatoes
  • (2) Bangers (I got them from the meat counter at Whole Foods)
  • 1 tsp butter
  • 1 cup beef stock
  • 1 tsp corn starch
  • Salt and pepper
  • Rosemary and thyme (about 1 sprig each)
  • 1/2 tsp garlic powder
  • 1/2 tsp onion powder
Instructions:

Mashed Potatoes:
  • Boil water in a medium saucepan.
  • Dice potatoes. 
  • Once water is boiling, add the potatoes.  Boil until fork tender.
  • When the potatoes are fork tender, add the butter.  Salt and pepper to taste.
  • Mash the potatoes (using a blender, mixer, or immersion blender.)
Bangers:
  • Set your skillet to medium heat.
  • Cook on each side for about four minutes per side.  (You want each side a nice, golden brown.)
  • When fully cooked, set aside. 
  • Save all drippings.
Gravy:
  • Using the skillet that you used for the sausage, raise the heat to medium-high heat.  Pour in the beef stock.
  • Chop and add the herbs.
  • Add the garlic and onion powder.
  • Add salt and pepper to taste.
  • Mix cornstarch and water (about a tsp.) in a cup, and whisk into the boiling herb broth.
  • Turn off the heat.
  • Whisk until the proper consistency. (If it gets too thick, add a bit of water to thin it out a bit.)
To Serve:
  • Scoop one serving of potatoes onto each plate.
  • Slice the sausage and place on top of each plate of potatoes.
  • Add gravy.
  • Serve!


This was also really delicious when I reheated my other half of it for lunch with some corn.  Yum!

Monday, I'll be sharing another deliciously easy way to make roasted chicken- and what to do with some of the leftovers!  Have a great weekend!

Thursday, August 11, 2011

Flatbread Pizza!


Over the last two and a half weeks, we've done a lot.  I've signed up for two mommy groups (something I was always too nervous to do in Philadelphia), made some new friends in the area, and have discovered some really great places to eat.

The only thing that I haven't been able to find is really great pizza.  For some reason, the pizza here tastes really bland.  The dough doesn't have that amazing texture that pizzza had back home.  The pepperoni and sauce are missing that really kickin' spice that you can find in PA.  Here, people eat pizza from chains.  At home, we ate pizza from the Italian neighborhood we lived in.

Last Sunday, we went to a Greenville Drive game with a mommy group that I joined.  The game was really fun and the moms' seemed really nice!  After the game, Kyle and Laela were cheering "pizza! pizza! pizza!", so we ran to the store, picked up some ingredients, and I came up with this totally tasty flatbread pizza.


This pizza is practically effortless!

Flatbread Pizza with Tomatoes, Basil, Ricotta Cheese, Pepperoni and Mozzarella
You'll need:
  • 1 tomato
  • 6 basil leaves
  • Pasta sauce (as much or as little as you'd like)
  • Fresh mozzarella (I used mini balls, about 5 will do.)
  • 1 piece flatbread
  • Olive Oil
  • Ricotta cheese (about 4 tsp, depending on how cheesy you want it.)
  • Pepperoni (optional)
Instructions:
  • Heat your oven to 400 degrees.
  • Brush your flatbread on both sides with olive oil.
  • Toast the flatbread for ten minutes in the oven.
  • Take the flatbread out of the oven.
  • Using a cookie scoop or a spoon, scoop about four tsp of ricotta cheese onto the flatbread.
  • Spread some sauce over the ricotta.
  • Slice the tomato into thin slices.  Add the slices to the pizza.
  • Add the basil.
  • Add the pepperoni slices.
  • Slice your mozzarella balls into halves.
  • Place them on the pizza.
Bake for 10-15 minutes.  Serve!!

*Since Kyle does not like tomatoes on their own, I  made him the same thing without the tomato slices.

Tuesday, March 22, 2011

Beef and Ale Stew

Oh Spring, supposedly you're here, and when I look outside, it really looks like it!  Then I go outside.  And have to scurry in for my coat.  And scarf.  And normal shoes.  Ugh.  I was so looking forward to rocking some flipflops and being able to play outside for longer than 20 minutes! 

Alas, nature is not on my side.  The one benefit is that we can still rock out some stew!  (We live in one of those houses where certain foods are considered seasonal.  Kyle refuses to allow for hamburgers in Winter or lasagna and stew in Spring.  Personally, I could eat anything anytime, but I've got to respect his quirks.  And go out for hamburgers when I want one in Winter!)

We've visited a recipe similar to this before when I shared my beef beerguinon recipe, but this one has a lot less steps and takes some seriously minimal effort.  I used one of my favorite chefs, Jamie Oliver, for this one (thank you Food Revolution!), and added my own little twist.


Beef and Ale Stew
serves 4-6

Ingredients:
  • 2 stalks celery
  • 2 medium onions
  • 2 carrots
  • olive oil
  • 1 heaped tablespoon all-purpose flour
  • 1 x 14-ounce can of diced tomatoes (or if you don't like chunky tomatoes, tomato puree)
  • sea salt and freshly ground pepper
  • 2 cups brown ale, Guinness or stout (I used Terrapin Brown IPA)
  • 3 fresh or dried bay leaves
  • optional:  1 cup diced tomatoes, 2 cups peas, 4 medium potatoes- red or yukon gold.
Instructions:
  • If using the oven to cook your stew, preheat it to 350-degrees
  • Trim the ends off your celery and roughly chop the stalks
  • Peel and roughly chop the onions
  • Peel the carrots (I was lazy and didn't do this), slice lengthways, and roughly chop
  • Put a Dutch oven on a medium heat
  • Put all the vegetables and your bay leaves into the pan with 2 lugs of olive oil and fry for 10 minutes
  • Add your meat and flour
  • Pour in the booze and canned tomatoes/puree
  • Give it a good stir, then season with a teaspoon of sea salt (less if using table salt) and a few grinds of pepper
  • Bring to a boil, put the lid on, and either simmer slowly on your cooktop or cook in an oven for three hours.
  • Remove the lid for the final hour of simmering/cooking and add a splash of water if it looks a bit dry
  • When done, your meat should be tender and delicious
  • Remove bay leaves before serving and taste to see if it needs more salt and pepper.
Here's where I deviated from Jamie...

I cooked some quartered potatoes in olive oil, garlic and onion powder and stirred them in with the stew when there was an hour of cooking left.

Since Kyle hates chunky tomatoes, I put them at the bottom of Laela and my bowls so we'd have them, and just poured the stew on top.

I also added some peas to the bottom of Laela and my stew, because well, I always like something green, and I had a hankering for peas.


This meal is delicious, and it just gets better with each passing day!

Monday, March 14, 2011

Five Minute Minestrone

I think I'm going to write Nigella Lawson a letter thanking her for writing Nigella Express.  It's the perfect quick food cook for someone who loves variety in their breakfasts/lunch/dinners, and doesn't always have a ton of time on their hands.

I was feeling kind of blah the other night, and seriously unmotivated to make dinner, so when I found Nigella's minestrone soup recipe, I dove into my fridge, grabbed the ingredients, and whipped up dinner so fast my husband was baffled how something so good could be made so fast!

Nigella's Minestrone in Minutes
Ingredients:
  • 1 14-oz can mixed beans (sometimes sold as mixed bean salad) or other canned beans
  • 3 cups chicken or vegetable stock
  • 1 cup tomato-based pasta sauce of your choice
  • 4 oz ditalini or other soup pasta
Instructions:
  • Drain the beans and put them into a saucepan with the hot stock and pasta sauce.
  • Bring the pan to a boil and then add the ditalini, cooking according to package instructions.
  • Once pasta is tender, switch off the heat, remove the pan to a cool surface, and let stand for 5- 10 minutes if you can bear to wait.  The pasta swells in the soup, and everything just gets better.  (Basically, once you've rounded everyone up and set the table, the soup is plump and delicious.)

I added some peas to Laela and my portions of the soup, because I just felt guilty having this without any veggies (although after I'd thought about it, I had put pureed carrots, celery and onion in my spaghetti sauce, so I really didn't need the peas.)

You might think this is one of those soups that's not super filling, but trust me, it really is.  There was enough of this soup to feed Kyle, me and Laela, plus two extra bowls for later.

Monday, March 7, 2011

Sneaky Meatloaf


I know we've visited meatloaf before.  I promise you though, this meatloaf is a little bit different.  I did the usual with the ground meatloaf mix (lamb, beef, and pork), egg, and breadcrumbs.  Here's where we get a little sneaky...I pureed a bunch of yummy steamed veggies- peas, broccoli, carrots, celery and onion.  I topped it with pasta sauce, and there you go!  A super simple, super healthy, and incredibly easy dinner!

You need:
  • 1 pound meatloaf mix
  • 2 celery stalks
  • 2 carrots
  • 1 medium onion
  • Italian seasoned breadcrumbs
  • 1 egg
  • Ketchup
  • Broccoli (I use about a cup)
  • Peas (I use a little less than a cup)
  • Pasta Sauce
  • Salt and Pepper
Directions:
  • Chop the celery, carrots and onions.  Sweat (cook until fork tender- you'll see moisture released as you do this) the celery, carrots and onions.  Steam the broccoli and peas. 
  • Puree all of the vegetables.
  • In a large bowl, add the vegetables, salt and pepper, egg, and a good squirt of ketchup.  Add enough breadcrumbs to bind it together so it's not slimy, but moist and firm.
  • Preheat your oven to 350-degrees.
  • Drizzle olive oil onto a baking sheet
  • Form your meatloaf/spice/breadcrumb mixture into two small logs.
  • Cook at 350-degrees for twenty minutes.  Top with pasta sauce (or if you don't like pasta sauce, my girlfriend Laraine swears by barbecue sauce- I've tried it and I've gotta say, it's a great change of pace, and is super yummy), and cook for 15-20 more minutes.
  • Wait about five minutes so that you don't lose its juiciness, and serve.

Enjoy!

Wednesday, February 9, 2011

Leftovers Kicked Up a Notch!

Kyle and I went on a hot date at the Melting Pot the weekend before he had to leave for London, and if you've ever been there, you know that you go home with a TON of leftovers.  We had enough pieces of chicken, filet mignon, shrimp, salmon, and duck leftover to make a hearty dinner for the three of us, plus a huge lunch for Kyle to bring to work.

Best part?  It takes ten minutes, and you should have all of the ingredients ready to go in your fridge.


Ingredients:
  • (1) package chow mein noodles. (Although, any kind of asian noodles are fine.)
  • All of your meat/poultry/fish leftovers. (This works for ANY kind of protein.  You can even use eggs if it really blows your hair back.)
  • Mixed veggies- I always have a bag of asian mix in my freezer, but any veggies will do. (enough for 4 people.)
  • (3) Tb Soy sauce
  • Ginger (fresh is always better, but if you don't have it, just use any kind you  have in your spice cabinet)
  • Pepper
  • Cayenne Pepper
  • (3) Tb honey
  • (2) Beef boullion cubes
  • (2) Tb flour
  • (1) Tb onion powder
  • (1) tsp crushed garlic
Directions:
  • Cook your noodles according to the package instructions, with beef boullion in the water.
  • Dump all of your protein into a bowl and toss in the flour.  Make sure each bite is lightly coated in flour.
  • Put the pan on medium high heat.  Pour the protein and any remaining flour into the pan.
  • Ladle one ladle-full of the noodle broth into the hot pan.
  • Add in the honey and soy sauce.  Add a few good shakes of pepper, cayenne (depending on how hot you like your food), and ginger (again, some like more ginger, some like less- remember that you can always add more).
  • Cook for two minutes, keeping the protein moving.
  • Stir in the veggies.  The sauce will cook them quickly. 
  • Lower your heat to medium low heat.
  • When the noodles are done cooking, rinse them well and toss them in the pan.
  • Stir the noodles into the mixture.
  • Cook for one minute, stir occasionally.
  • Serve! 
I hope you enjoy this as much as we did!  I made it a little spicy, and was pleasantly surprised to find that my little girl loved it too!!

Monday, February 7, 2011

Lentil Soup with a Dash of Love

Whenever I hear someone mention lentil soup, I think of two things- the worst soup I've ever had, and the best soup I've ever had.  One of the first times I had it, I swear it was cooked in water with salt and pepper.  It had NO love in it whatsoever.  The first time I remember really remember LOVING it was this older Greek woman's soup that was garnished with red peppers and had a faint taste of red vinegar.  I've tried my damnedest to make her recipe, and I've just never been able to figure out what she did to make it so amazing.

This go around, I asked my good friend, Dawn, to give me some tips on how she makes her soup so yummy.  Her family makes "lucky lentil soup" that is made for the first day of the New Year, and if I'm guessing correctly, whomever receives the bay leaf is to have good luck that year.  (I grew up with that same tradition, except the bay leaves were in spaghetti sauce..but that's a post for another day.)

Anyway, Dawn recommended some pureed celery and carrots (Can you say yum?  And sneaking in veggies!  I'm in!)  She also recommended sun-dried tomatoes, which sounds super awesome, but I didn't have any on hand, so I just had to improvise with a fresh tomato.


Here's my twist on lentil soup..

Ingredients:
  • (1/2 lb) Dried lentils
  •  (3) Carrots
  • (1) Celery stalk
  • (1) Medium Tomato
  • (2) Boullion cubes (I used vegetable, but I'm sure chicken or beef would be good too)
  • (4) Cups water
  • (2) Tb Crushed garlic
  • (1) Tb Onion powder
  • (1) Bay leaf
  • Salt and Pepper to taste

Directions:
  • Measure four cups of water and pour it into a medium soup pot.
  • Chop the celery and carrots.  (I used the celery leaves as well.) 
  • Add the celery and carrots to the boiling water.
  • Boil for ten minutes.
  • While the veggies are boiling, slice up the tomato.
  • Sprinkle some olive oil in a medium-high skillet.  Salt and pepper both sides of the tomato and place each slice in the skillet.  Lower the heat to medium heat.  Cook for two or three minutes per side.
  • DO NOT DISCARD THE VEGETABLE WATER.
  • Use a slotted spoon to take out the vegetables.
  • Put the carrots, tomato and celery in a food processor or blender and puree.
  • Rinse the lentils.
  • Pour the rinsed lentils into the vegetable water.
  • Add the pureed vegetables.
  • Add the crushed garlic and onion powder (if you want to use fresh onions, just sautee them and puree them.  I used onion powder because I didn't have onions on hand.)
  • Add the boullion cubes.
  • Bring to a boil.  Once you have brought the soup to a boil, lower it to a simmer and place a lid on the pot.
  • Cook for 20 minutes.  (This is one of those dishes that tastes better the longer you cook it.  I let mine simmer on low heat after the twenty minutes were up for an extra hour, for a total time of 80 minutes.  The rule of thumb with sauces and soups (and food in general, really) is that if you put a little love in it, it'll taste like it.  So if you have the time, definitely take it.  If not, it'll still be a pretty darn delicious soup!
Oh, and as you can see from this picture, Laela really loved this soup!!


I know that it seems like there are a lot of steps in this dish, and it may not be the simplest recipe I've posted...but it really isn't too difficult, and it's definately worth the effort!

*This soup will freeze for 6 months in a normal home freezer, and 1 year in a deep freeze.

Wednesday, January 12, 2011

Quick and Easy Lemon Garlic Tilapia

I had a pretty rough night last night.  Laela was chanting for Daddy before bed, so it really didn't help that the snow plows woke her up three times and reminded her that, nope, Daddy still isn't home to come cuddle her when she's freaked out.  If you see Mr. Snow Plow, thank him for cleaning our roads, but ask him if it's necessary to be so loud?  I'm just sayin'.

Since I'm so zonked, I'm going to give you the easiest fish recipe you'll ever make in  your life.  Seriously.  I came up with this the other night when I realized that it was 6pm and I had nothing defrosted.  A quick stop at the fish market and I had dinner ready in ten minutes, prep and all!

You'll need:

1lb tilapia
1 lemon
4Tb olive oil
Salt and pepper
1 heaping tablespoon of garlic

Heat your pan to medium heat.  Drizzle your 4Tb of olive oil in the pan.  Add the garlic.  Slice one half a lemon into thin slices and place them in the pan.  Salt and pepper both sides of your fish.  Place your fish on top of the lemon slices.  Squeeze the other half of lemon, drizzling the juice all over the fish.  Cook about 4 minutes per side and you're done!

I made this with some yummy couscous (takes five minutes), peas (2 minutes), and steamed carrots (5 minutes).  The couscous and veggies all cooked while I waited for the tilapia.  It doesn't get much easier or faster than that!

Monday, November 8, 2010

Leftovers Pasta!

After going to the grocery store three times in one week, I made a decision.  With the exception of milk, eggs and bread, I'm not going to go grocery shopping until the fridge is empty.  I want to find out what I can do with the things in my pantry, fridge, freezer and cabinet, and how long I (well, and Kyle and Laela too) can get by without getting crazy bored or just plain stuck with the food that we already have.

You might be thinking that I'm a total weirdo, but think about it for a second.  How much food do we all waste in a week?  A month?  A year?  This isn't about carbon footprints or piles of waste that we have to deal with.  It's about the food.   First, it's recognizing that you can make delicious food out of pretty much nothing (I learned this from my great-grandmother who used to be able to make the most amazing biscuits for ten people with the very minimal ingredients in her pantry).  If mamas and grandmas could make amazing meals with scant supplies during the Depression, can't we try it out?  During these trying and unstable financial times, is it really such a wild food risk to learn to make do with what you've got now and then?  You might be surprised with what you will learn about yourself and your cooking ability.

Second, one of the biggest problems that a lot of us have is laziness.  We get in food ruts.  I say we because everyone does it.  I've done it!  When I lived alone, I went through a phase where I'd make a roast, live on it for a week or two, then make pasta, live on that for another week.  It was easy.  But damn if it didn't get boring from time to time.  So I learned to make lots of different things with the leftovers, or with the extra things in my pantry.  Give yourself a chance to make a little more effort for your dinner.  I'm not saying bust out the French cookbook and spend hours cooking, but try something new with the same old ingredients.  You may surprise yourself!

Let's call this "Leftovers Pasta".


I'm not going to give you the specific ingredients list for this pasta.  Just try using whatever you have on hand.  (If you do want to try out this exact recipe, combine some cooked ground beef, spaghetti sauce, garlic, chopped basil, cannellini beans and pasta.)

I was exhausted when I made this pasta.  We had some leftover spaghetti noodles, some leftover homemade pasta sauce, and some leftover cannellini beans that I had cooked in chicken broth and garlic.  We had some ground beef in the fridge, so I cooked it on medium heat with some salt and pepper.  Once the ground beef was done, I drained the grease, tossed it back in the pan, added the sauce and beans with some of the broth that the cannellini beans were in, and I added some fresh basil (I just ripped it up with my hands, but you can chop it if you'd like).  I let the sauce simmer with the beef and beans for five or ten minutes (the longer it simmers, the better it is, but if you don't have time, it'll still be delicious.)  Once I was ready for it, I added the cooked pasta and topped it with fresh basil.  If you have any parmesan shaker cheese or fresh parmesan, feel freed to add that as well!


Don't be afraid to raid your fridge and re-invent leftovers or old stand-bys.  Toss your leftover spaghetti and sauce in some olive oil with some broccoli for a fun twist, and bake your leftover spaghetti for a change!  You don't always need to run out to the store, rush around like a maniac to get a healthy, delicious meal on the table.  Try something new!  Go for a new food experience!

*My homemade pasta sauce